
 Back to Blog
By Lauren Nagel
WindShapers are the latest technology in drone aerodynamic testing, but what are they exactly? The terms ‘open air wind tunnel’, ‘wind generator’, and ‘3D wind flow creator’ are all accurate, but they don’t fully capture what the WindShaper can do.
In this article we will explain what a WindShaper is, how it works, and how it's an improvement over other drone testing technologies. Here’s an overview:
Table of Contents
- What is a WindShaper (concept and structure)
- How to Control the WindShaper
- What Kinds of Wind Shapes Can I Produce?
- Advantages and Disadvantages
- Compatible Systems (propulsion testing, tilting mechanism, etc.)

Figure 1: A fixed wing drone flying in front of a 12 x 8 module WindShaper
1. What is a WindShaper
The key component of aWindShaper is its main wall of fans that produces wind profiles for testing drones in various conditions. The types of tests possible include wind resistance tests, free flight tests, and many more.
WindShapers are highly modular in shape, as they are composed of base units called ‘wind modules’ that can be stacked and combined in any combination. The size of the WindShaper is described by the number of modules it contains, i.e. a 6 x 3 WindShaper would be 6 modules wide by 3 modules tall.
Each wind module measures about 25 x 25 cm and contains 9 individual wind pixels. Each wind pixel is controlled individually and contains two fans. Fans can produce a wind speed of up to 16 m/s (36 mph), or up to 45 m/s (100 mph) with a convergent, depending on the size of the WindShaper.

Figure 2: A 2 x 2 WindShaper with a wind module and wind pixel labeled
Each fan can be individually programmed in terms of speed and timing, thus permitting the user to create 3D wind profiles. We will discuss this more in section 3.
In addition to the main wall of fans (1), users can add side walls (2) to create crosswinds, simulate corners, and diversify the testing possibilities. The other key components include the power distribution boxes (3), and onboard computer (4), all seen in figure 3 below.

Figure 3: The structure of a WindShaper
What you’ve likely noticed is that these WindShapers come in all shapes and sizes - some can fit on your desk while others require their own lab space.
2. How to Control the WindShaper
The WindShaper is controlled with the WindControl software, whose GUI is pictured below (figure 4). The PWM legend at the far right indicates the power supplied and each pale blue square represents a single wind pixel (fan unit). The fans used on the machine comprise two layers of counter rotating rotors, called fan layers. By default, both layers are set to the same speed or PWM value. This achieves the best performance and lowest swirl level, but if desired, fan layers can be controlled independently.
In this particular WindShaper, there is a main wall measuring 12 modules wide by 8 modules high, plus two side walls measuring 2 modules by 8 modules, giving you a total of 1008 wind pixels, or 2016 individually controllable fans. All three walls can be controlled simultaneously using either manual control or the advanced Python API.

Figure 4: The WindControl software interface
Manually controlling the wall is as simple as typing in speed values for individual pixels (or groups of pixels), which are activated immediately. When the user is ready to change the power to a group of pixels, they simply select those pixels and type in a new value, offering dynamic control of the WindShaper. You can also input a mathematical function to have the machine reproduce any steady or time-variable wind profile.
A Python API is also provided with the machine that allows the user to program automated tests. The wind flow is designed ahead of time and runs independently without intervention. This allows the user to focus on controlling the aircraft / airfoil or observing the test. The Python API also allows users to generate more complex flow, and to interface the WindShaper directly with other systems (drone, tracking cameras, connected probes, etc.)
Once tests are completed, data from each wind module can be output into a zip folder on the home computer containing time-stamped information about the WindShaper's performance and status.
3. What Kinds of Wind Shapes Can I Produce?
With a WindShaper you can create a number of wind situations, both constant and time-variable. Here are a few of the basic categories of wind shapes that can be used alone or in combination.
Steady Flow
This setting mimics the constant flow you are mostly likely to see in a traditional wind tunnel, which is great for evaluating the aerodynamics of a drone. A steady condition is generated by setting the WindShaper’s flow speed to the speed the drone would be traveling in still air, while the drone maintains its position above the ground. In this scenario, the relative wind speed, as seen by the drone, is equivalent to the speed the drone would be flying. A flow straightener may be used to achieve a wind flow with a lower turbulence level.
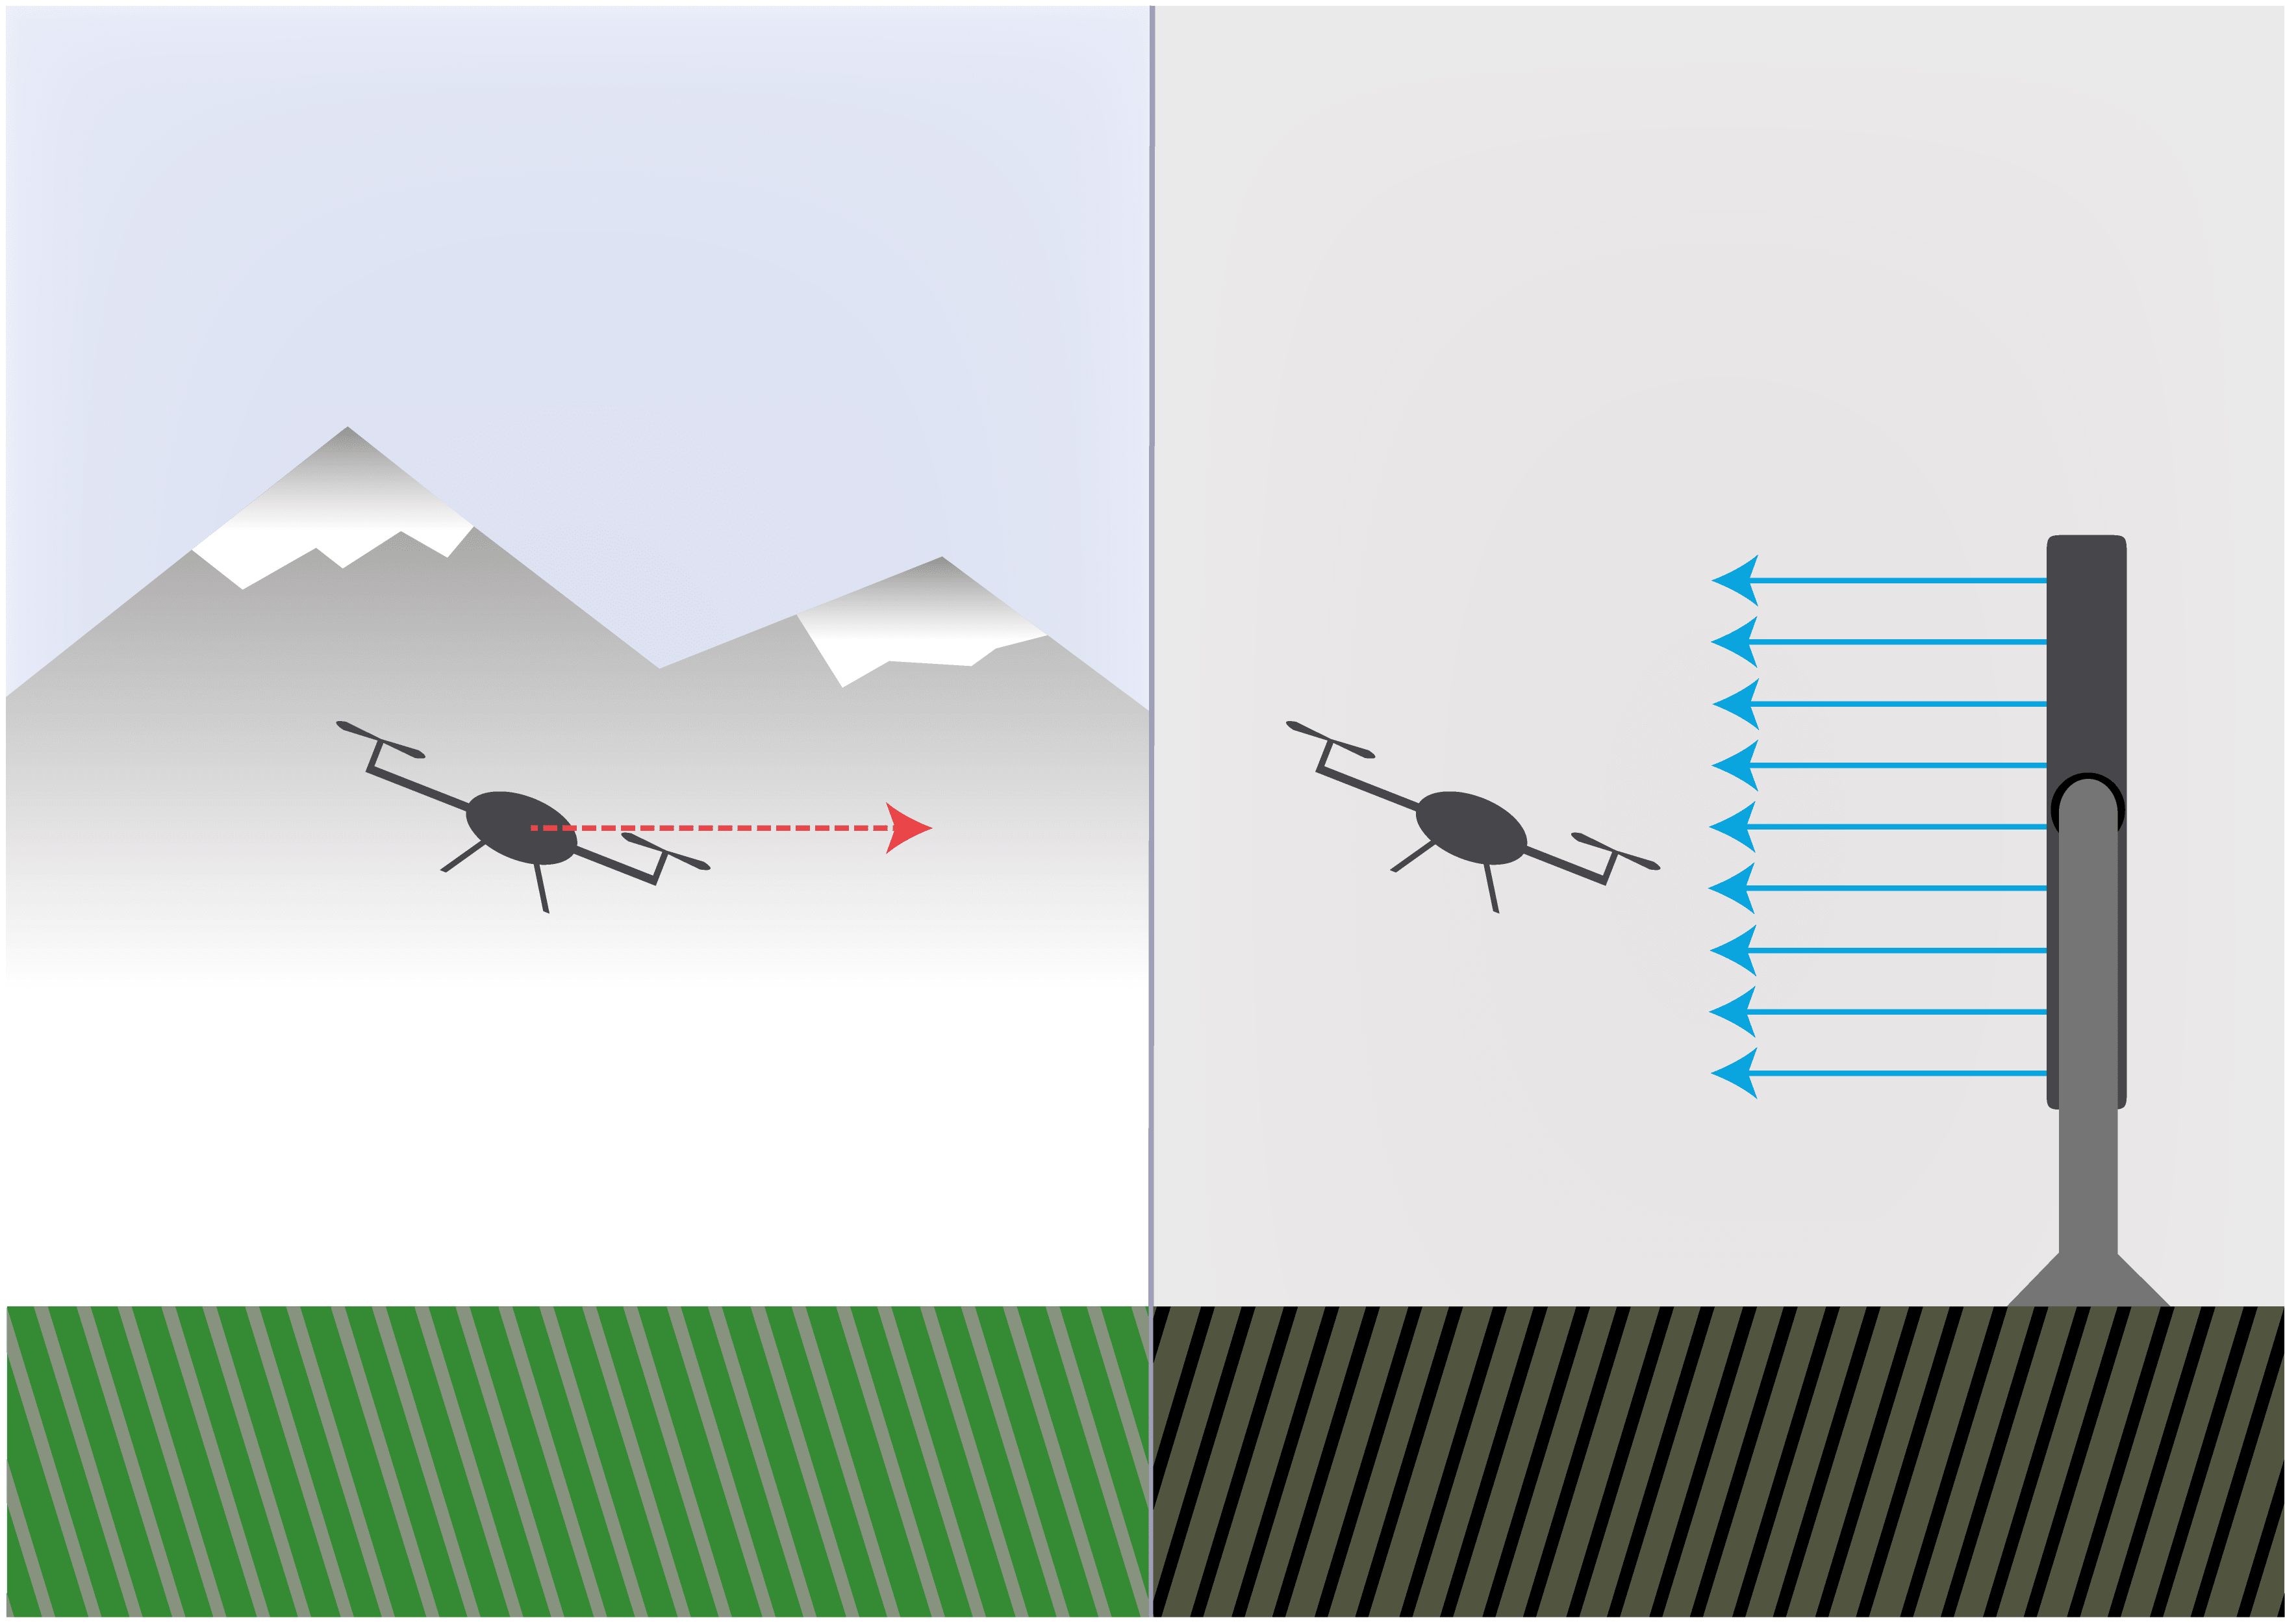
Figure 5: A drone flying in steady wind
Turbulent Flow
Turbulent flow is ideal for simulating the conditions a drone is likely to face in its work environment due to weather and topology. At the altitude drones typically fly, it is unlikely they will experience laminar flow. In this test setting, the level of turbulence can be controlled by modulating the power delivered to each wind pixel. The turbulence level can be equal across the WindShaper or different in each section of the test area.

Figure 6: A drone flying in turbulent wind conditions
Shear Flow
The term ‘shear flow' describes a wind profile where adjacent layers of fluids move parallel to each other at different speeds. This can lead to flow instabilities near walls, foliage or in regions with noticeable thermal effects. This can be simulated by setting wind pixels on one fan array to a slow wind speed and setting wind pixels on an adjacent fan array to a higher wind speed. This technology also enables users to easily generate a boundary layer without needing to use traditional boundary layer generators such as roughness blocks or spires that are found in traditional wind tunnels.

Figure 7: A group of drones flying in an environment with wind shear
Time Variable Flow
With time variable flows you can create unique wind profiles by changing the wind speed of each wind pixel over time. A given wind pixel may begin at 2 m/s, increase to 10 m/s, then return to 2 m/s and so on. With this level of control you can create wind shapes that simulate real-life flying conditions, like a vehicle passing a drone (figure 8).
Figure 8: The wind speed experienced by a drone changes as it flies behind a truck
Wind Gust
Sudden changes in wind speed (gusts) can be challenging for a drone to navigate. Gusts can be simulated with rapid changes in wind speed coming from the wind pixels. This allows you to study drone displacement or resistance to gusts, and the responsivity of the flight controller. Adding additional side walls to the WindShaper is another way to simulate gusts and crosswinds.

Figure 9: A drone experiences a gust of wind as it flies around a building
Vertical Wind / Landing Phase Optimization
While landing, drones experience a relative wind from below caused by their own wake (downwash), which leads to an unstable situation. To simulate this situation, the WindShaper is placed horizontally and generates a wind flow equivalent to the drone’s downwash.

Figure 10: A drone practicing take-offs and landings
As you can see, there is a great variety of wind shapes you can produce with these WindShapers, and this article doesn’t even cover them all. If you have a specific type of test in mind,contact our sales department to see if it’s possible.
4. Advantages and Disadvantages
There are several advantages and disadvantages to working with a WindShaper for drone testing and validation. Here are a few of the most important ones:
Advantages
- Controllability and repeatability of tests:when performing a test flight outdoors, the weather and wind can be unpredictable, making it hard to get repeatable results. With a WindShaper you can program your wind conditions to perform the same test again and again.
- Convenience: The WindShaper is on wheels so it is easily moved and positioned where needed. It also takes very little storage space thanks to its compact shape.
- Large testing space: the modular design of the WindShaper means you can build a test area as big as you need. This allows you to test full size aircraft or even multiple aircraft to test formation flying.
- Time variable flows: since each wind pixel is controlled individually, it is possible to create time variable flows across the testing space, something that is not possible when using a single fan in a traditional wind tunnel. This adds the possibility of replicating complex atmospheric flows that vary both in time and space.
- Free flight testing: the design of the WindShaper provides enough space for the drone to fly in front of it while staying within the programmed wind flow. This is in contrast to most traditional wind tunnels that require the drone to be stationary in the tunnel or bound in some way.
- Infinite testing possibilities: since each wind pixel is controlled individually, there is a nearly infinite number of testing possibilities, including variations on turbulence, gusts, thermal effects, and more
- Horizontal and vertical testing in one:with the added tilting capability of the WindShaper, it can be used as both a horizontal and vertical wind source. With a traditional wind tunnel, this would require building two separate facilities.
- Uniformity on demand: flow uniformity can be tweaked with software to ensure a perfectly flat profile across the test section, unlike traditional wind tunnels.

Figure 11: Testing a quadcopter with an 8 x 8 WindShaper
Disadvantages
- Wind speed is limited: WindShaper wind walls allow for a maximum wind speed of 20 m/s (45 mph), or up to 58 m/s (130 mph) with a convergent. While this is suitable for testing most drones, it does not reach transonic or supersonic speeds.
- Turbulence level: compared to aeronautic grade wind tunnels, the turbulence intensity of a WindShaper is not as low (approximately 5%). But an optional flow filter (see section 5) can be used to lower the turbulence level below 1%.
- Noise: due to their small fans, WindShapers will generate a higher frequency noise compared to traditional wind tunnels. But since this noise is high frequency, it will not propagate as far, and can be easily stopped by a concrete wall or a pair of earplugs (compared to other large wind tunnels that can shake a whole building and need dampers to operate properly).
5. Compatible Systems
The WindShaper has several complementary systems that can enhance your drone testing. Contact our sales team for more information about any of these add-ons:
Propulsion Test Stand
WindShapers can be partnered with a measurement test stand to allow you to record performance data while your propulsion system experiences different wind conditions. The2 x 2 WindShaper Station is specifically made for this application, allowing you to test motors and propellers producing up to 5 kgf of thrust that are up to 16” in diameter.

Figure 12: A 2 x 2 WindShaper Station
You can also use a larger test stand with a custom sized WindShaper for larger drones. For example, the Flight Stand comes in two sizes for measuring 15 or 50 kgf of thrust for single or coaxial motor setups.

A propulsion test stand lets you measure the thrust, torque, RPM, power and efficiency of your system at every stage of your flight.
Convergent
A convergent device allows you to increase your maximum wind speed from 16 m/s (36 mph) up to 45 m/s (100 mph). The convergent attaches to the front of the WindShaper and passes high speed air through an enclosed test area. Note that this device will reduce your test area size, depending on the size of the WindShaper. Adding a divergent after the test section (as in figure 14) can further increase wind speed past 55 m/s (135 mph).

Flow Filter / Turbulence Reduction
A flow filter can be added to your WindShaper to reduce unwanted turbulence and ensure a low turbulence intensity. This feature ensures an even flow of air and is a great option for more traditional aerodynamics testing using force or pressure measurements, which can benefit from a lower signal to noise ratio.

Figure 15: A 6 x 3 WindShaper with a filter to reduce turbulence
Tilting mechanism
The tilting mechanism add-on allows you to rotate your WindShaper 90 degrees, so it can be standing vertically or laying horizontally. This is a great setup for simulating the effects of thermals, ground effect, and practicing landings in different conditions. It is not only a tool for measuring your drone’s performance, but also for allowing your pilots to refine their skills.
Conclusion
If you have any remaining questions, leave us a comment below and we will be sure to get back to you.
If you’re interested in purchasing a WindShaper, you can request a quote from our sales team.


Saad
October 28, 2024
Hello,
I am currently working on enhancing the efficiency of wind turbines, specifically focusing on diffuser-augmented wind turbines. I have experimented with various configurations of turbines and diffusers in lab-scale tests. Moving forward, I am considering using a Windshaper as the wind source for my experiments. This modular design would allow me to assemble and customize my test rig. I am particularly interested in a 2×2 Windshaper for educational purposes and small-scale research. could please send more info and the price if possible with optional choice